
Alright, so you’ve got Ubuntu 22.04 fired up on your system, and now you’re eyeing Git – that magic sauce developers sprinkle on their projects. Whether you’re a coding guru or just dipping your toes into the dev world, having Git cozy on your Ubuntu is like having a superhero sidekick for your code adventures. We get it, tech installations can feel like trying to solve a Rubik’s Cube blindfolded, but fear not – we’re breaking it down. In this guide, we’re going to take you by the hand and stroll through the whole “How to Install Git on Ubuntu 22.04” thing. No tech jargon rain, just simple steps from start to finish.
Ubuntu 22.04 brought its A-game, and now it’s your turn. From setting up to giving your system a friendly nod to confirm Git’s in the house, we’re here to make sure you’ve got a top-notch Git setup for your coding endeavors. So, buckle up, maybe grab a snack, and let’s learn about installing Git on your Ubuntu.
Updating your system:
Before we dive into the installation – you know, “Installing Git on Ubuntu” – let’s make sure your system up to the task. Fire up your terminal and execute the following:
$sudo apt update && sudo apt upgrade -y

It’s like your system’s way of having a morning coffee – wakes everything up, gets the latest gossips on the packages, and updates them to the freshest versions. Trust me, this small detour will be your hero in avoiding any hiccups when we get to the Git installation dance. So, let’s get the system jazzed up and then smoothly transition into the main event – Git on Ubuntu.
Install Git on Ubuntu:
While some installations might come with Git straight out of the box, let’s make sure if it’s already installed in your computer. In your terminal execute:
$git --version
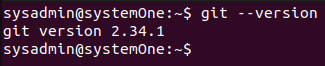
If you get an output with the version number, you already have the version control software installed on your computer. Otherwise, if you get the “command not found” output it means that you don’t it already and you can proceed with the installation.

Thankfully, Git is conveniently available through the APT repositories. You can go on and install Git on Ubuntu through your terminal using:
$sudo apt install git -y
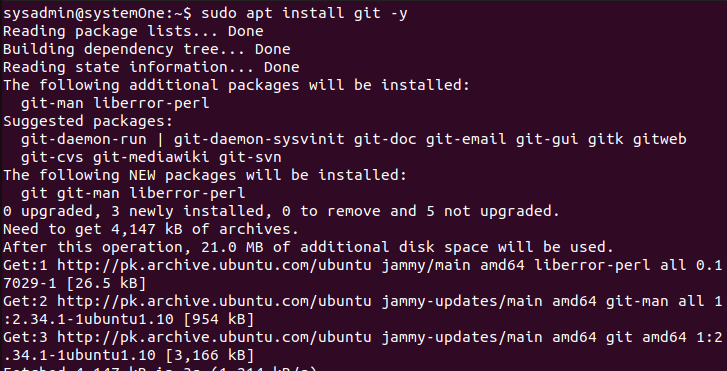
You will see a lot of output in the terminal. As soon as terminal is done installing Git on Ubuntu, you will get the capability to enter more commands again.
Install Git on Ubuntu: Verifying the installation
After the smooth ride of “Installing Git on Ubuntu,” let’s do a quick check. Open your terminal and execute:
$git --version
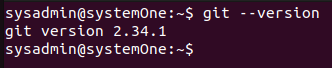
If everything went as planned, you’ll see the installed Git version. It’s like giving your system a friendly nod to confirm that Git is now on board and ready for action.
Install Git on Ubuntu: Setting up an account and repository in Ubuntu
After the installation, let’s get you set up with a user account and set up your first repository. To get started, you need to set up a username. You can do so in your terminal using:
$git config --global user.name "INSERT YOUR NAME"

You need to replace “INSERT YOUR NAME” with the username of your choice. Now you will need to provide your email address. Similar to the last step, you can do so using:
$git config --global user.email "[email protected]"

After these, you can set up a repository. Create a directory using:
$mkdir git-directory -p

Navigate to the directory using “cd”:
$cd git-directory

When you’re into the newly created directory, you can verify the set up using:
$git config --list

While there are numerous customizable options available, focusing on these two is crucial. Neglecting this step may result in warnings during your Git commits, leading to additional work as you’ll need to go back and amend the commits with the accurate information.
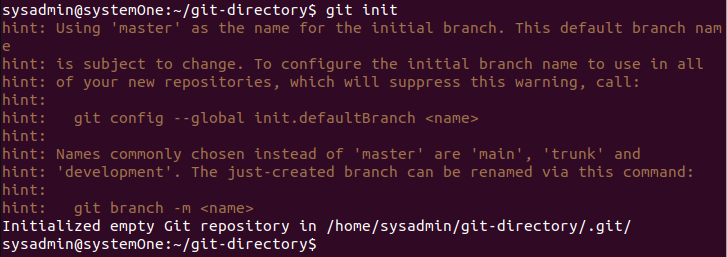
Now initialize git in the current directory using:
$git init
Verification
After the initialization, you can now run the following and if you see a similar output as below, you’ll know that you will have been successful in installing Git and setting up your first repository.
$ls -a .git

With this output, your account and your repository will have been successfully created.
Conclusion
And there you have it – the lowdown on effortlessly installing Git on Ubuntu 22.04. We’ve taken you from the prelude of updating your system to the sweet symphony of verification with “git –version.” Now, armed with the latest Git wizardry, you’re set to weave your coding magic.
Remember, learning how to “Install Git on Ubuntu” isn’t just a technical ritual; it’s your ticket to streamlined version control, collaboration, and a smoother coding journey. So, whether you’re sculpting a masterpiece or just tinkering with some code snippets, having Git at your fingertips is like having a trusty sidekick in the vast landscape of software development.
Now, go ahead and let your Ubuntu system be the canvas for your coding adventures, all while Git stands guard, ready to dance to your commands. Learn more about Git from their official website.
For more how-to’s and tutorials, please visit Green Webpage knowledgebase.