GCC stands for GNU Compiler Collection. It’s a suite of compilers for various programming languages, primarily known for its support of C, C++, and Fortran. GCC is free and open-source software and is widely used in the development of software for Unix-like operating systems, including Linux. It’s known for its robustness, performance, and portability, and it’s a crucial tool in the software development process for many developers and organizations.
This guide shows you how you can install GCC on Ubuntu 18.04, Ubuntu 20.04, Ubuntu 22.04, and Ubuntu 24.04 LTS releases. If you are using Red Hat Enterprise Linux 9 in your environment, read this article.
Prerequisites
Ubuntu (18.04, 20.04, 22.04, or 24.04 LTS) instance.
An account with sudo privileges.
Install GCC on Ubuntu 22.04/24.04
Open up the terminal and update the packages list.
sudo apt update
This operation can take several minutes. Once you have updated the package repository, head over to the next step which is installing GCC on Ubuntu.
Run the following command with sudo privileges.
sudo apt install gcc
Wait for several minutes to complete the installation. You may be asked to press y/n options. Press y to run the installation.

After the GCC installation is successfully finished. Run the below command to cross-check the installation.
gcc --versionThis should return you the version that has been installed on your machine as shown in the below screenshot.

You have successfully installed GCC on your Ubuntu machine. Let’s compile and run a small C program.
Compile and Run a C Program
Let’s create a simple C program that prints Hello World on the terminal. Open your favorite editor and paste the following code.
#include <stdio.h>
int main(void)
{
printf("Hello World!\n");
return 0;
}
Save the program with the C extension. Let’s say hello.c

On the terminal run the following code which compiles this newly coded C program and creates an executable file a.out.
gcc helloworld.cRun the executable file a.out as follows.
./a.out
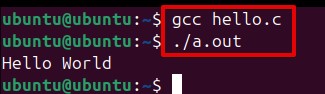
Congratulations, you have successfully compiled the C program with GCC and have run it.
Uninstall GCC from Ubuntu 18.04/20.04/22.04/24.04
If GCC is no longer required on your machine, you can uninstall it by executing just a single command.
sudo apt remove gcc
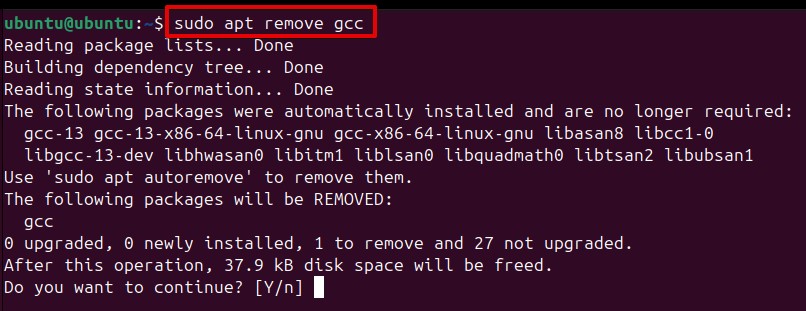
When you run the command gcc –version, you will notice that GCC is not available.

Conclusion
As you have seen, installing GCC on a Ubuntu machine is straightforward. All you have to do is the update the repository and then run a command sudo apt install gcc to install the compiler. You can then verify it by gcc –version command or by a compiling a simple C program.
For more information about GCC, read its documentation. If you like this article, please share it, and subscribe to Linux World. Thank you!