
In this article, we will talk about Linux grep command. Before starting to write the article, let’s see what is grep command.
Grep stands for global regular expression print and it is used to search for a particular string/keyword from a file and print the matching line on the terminal.
It searches line by line and displays the line where the keyword is present. It is a widely used command. We can use it in log analysis, files, directory searches, etc.
Syntax
The command has following syntax.
grep [option].. keyword [File]..
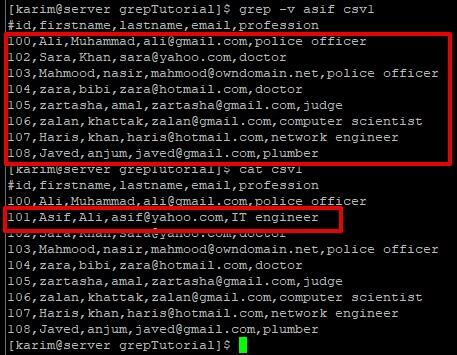
Example 1
Grep is a case-sensitive command. Ali and ali will be two different keywords.
To ignore the upper and lower case while searching.
grep -i “keyword” file
grep -i ali csv1
Example 2
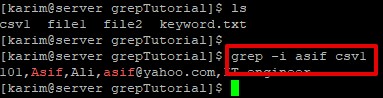
In the above example, we have searched a particular record. What if we need to display all the records other than the keyword? We can use -v option.
To search everything except the given keyword/pattern.
grep -v “keyword” file
grep -v asif csv1
You will notice that the record 101 is missing after executing the grep command with -v option.
Example 3
To print how many times (count) a given keyword is present in the file.
grep - c “keyword” file
grep -c asif csv1

The command returned 1 because asif keyword is present in one line.
Example 4
Until now, we were getting related patterns, Now, we want to get or search for exact patterns or keywords from a file.
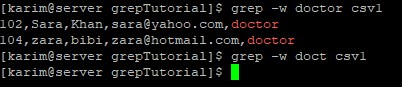
To search for an exact match of a given keyword in a file.
grep -w “keyword” file
Let’s take an example, when we searched the doctor keyword, the command returned two records. But, when we searched doct keyword the command didn’t return any result.
grep -w doct csv1
Example 5
To print the line number of matches of a given keyword in a file.
grep -n “keyword” file
We are saying to search the keyword and return the line along with line number. N for print line number.
grep -n asif csv1

Example 6
Until example 5 we were searching in a single file. How would you do if you wanted to search in two or more than two files?
To search a given keyword in multiple files.
grep “keyword” file1 fie2 ..
grep name csv1 file1

As you can see name keyword is present in both csv1 and file1.
Example 7
To suppress file names while searching a given keyword in multiple files.
grep -h keyword file1 file2 ..
grep -h name file1 csv1

Example 8
Until now, we have been dealing with a single keyword. There will be many cases in which you must deal with more than one keyword. It would be impractical to use grep command again and again. You can use -e for this purpose.
To search multiple keywords in a file.
grep -e “keyword 1” -e “keyword 2” file..
grep -e khan -e asif csv1

Example 9
To only print file names that match the given keyword.
grep -l “keyword” file1 file2 ..
grep -l name csv1 file1

Example 10
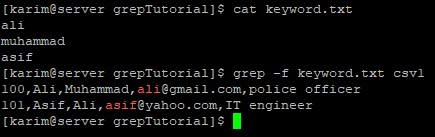
This is a practical example especially when you are working with scripting. Suppose there are 20 keywords to search. It would be impractical to input them on the terminal. You can place these keywords in a file.
To get the keywords/pattern from a file and match with another file.
grep -f keyword file..
grep -f keyword.txt csv1
Example 11
You may have a requirement that you want to search a line that starts with a particular keyword or character.
To print the matching line that starts with the given keyword.
grep “^keyword” file..
grep “^105” csv1

Example 12
To print the matching line that ends with a given keyword.
grep “keyword$” file
grep “officer$” csv1

Example 13
Suppose we have 100 files in a directory (dirA) and we need to search for a keyword in all the files.
grep -R keyword folder
grep -R name grepTutorial

Example 14
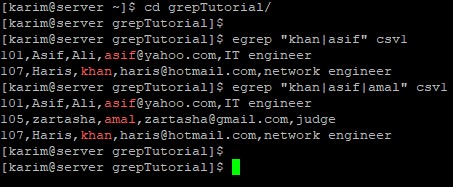
We can use egrep command for the multiple keywords search.
egrep “keyword 1|keyword 2|keyword 3” file
egrep “amal|khan|asif” csv1
Example 15
If you want to search and do not want to print the line on the terminal.
grep -q keyword file..
grep -q asif csv1
echo $?
0 means the command was successful and 1 means unsuccessful.
This case is used in scripting.

That’s all. I hope you liked the article. Thanks for reading. Keep visiting Linux World.