File Transfer Protocol (FTP) is a standard method for transferring files between computers over a network. To enhance security and reliability, VSFTPD, a popular and robust FTP server software, is often used on Linux systems, particularly Ubuntu. By establishing this server, you’ll enable secure file sharing across devices, with options to restrict access to specific directories and encrypt data transfers using SSL/TLS.
This guide will walk you through setting up a secure and efficient FTP server using VSFTPD on Ubuntu 24.04.
How to Setup FTP Server with VSFTPD on Ubuntu 24.04?
Establishing an FTP server on Ubuntu 24.04 requires a methodical approach to ensure seamless and secure file transfers. To configure a VSFTPD FTP server on this platform, this guide outlines the steps necessary:
Step 2: Allow FTP Traffic from the Firewall
Step 4: Testing the FTP Server
Step 1: Install VSFTPD
To set up an FTP server on your Ubuntu 24.04 system using the VSFTPD software, follow the detailed instructions provided below:
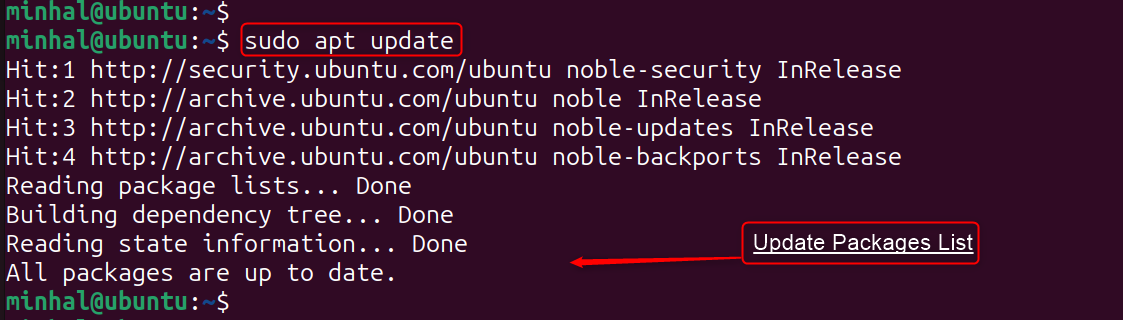
1. Update Package List
To initiate the process, the system’s software packages must be brought up to date. This is achieved by employing the “update” command-line utility:
sudo apt update
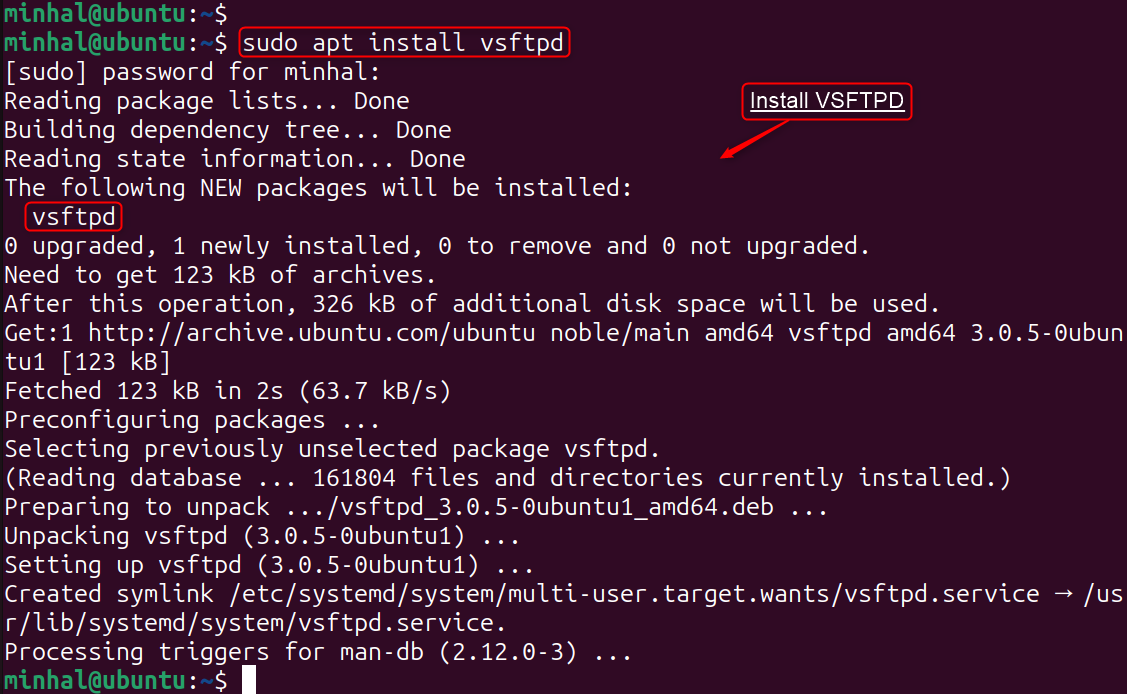
2. Install VSFTPD
Obtain the VSFTPD software by installing the ‘vsftpd’ package. This package is readily available within Ubuntu’s standard software sources:
sudo apt install vsftpd
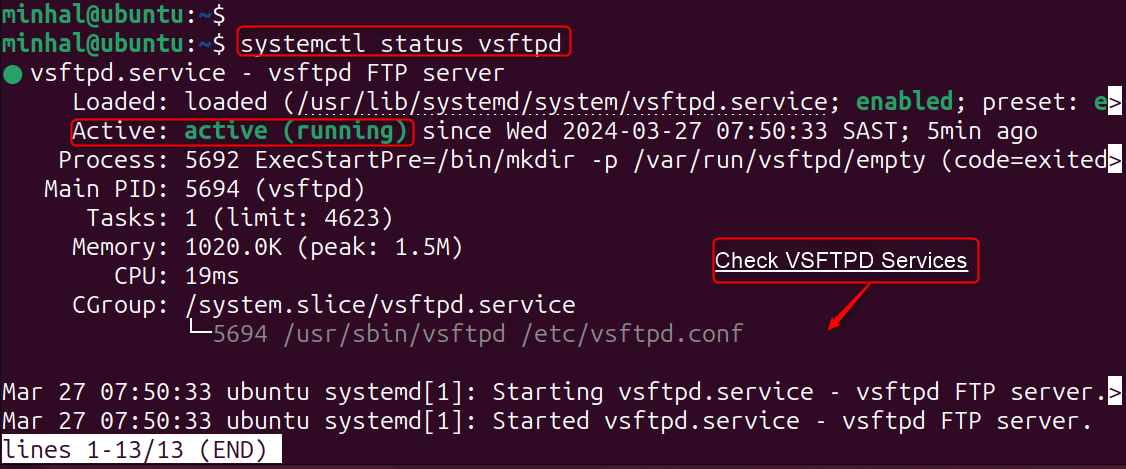
3. Check VSFTPD Service
Authenticate the VSFTPD service is running after installation utilizing ‘systemctl status’:
systemctl status vsftpd
4. Enable and Start VSFTPD Service
Users can enable and start the VSFTPD service using the systemctl command:
sudo systemctl enable vsftpd
sudo systemctl start vsftpd

That is how the installation of VSFTPD is done on Ubuntu 24.04.
Step 2: Allow FTP Traffic from the Firewall
To ensure smooth and secure file transfers on your Ubuntu 24.04 server, properly configuring the firewall is essential. This involves granting access to FTP traffic by adjusting UFW settings.
Follow this guide to open the necessary ports for both incoming and outgoing FTP connections.
1. Install UFW (If Not Already Installed)
Ubuntu includes UFW, a user-friendly tool for managing complex firewall rules:
sudo apt install ufw
2. Enable UFW
Configure UFW to launch upon system startup and then turn it on immediately:
sudo ufw enable

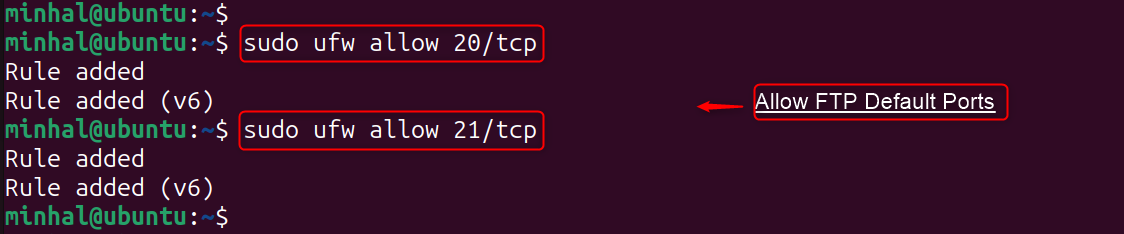
3. Allow FTP (Default Ports)
FTP uses ports 21 for command control and 20 for data transfer. Both ports must be open for FTP to function:
sudo ufw allow 20/tcp
sudo ufw allow 21/tcp
4. Allow Passive Mode (Optional)
When using passive FTP, specify a port range of 10000 to 10100 for data transfer:
sudo ufw allow 10000:10100/tcp

5. Reload UFW
Once you’ve specified the default or specific ports to allow, you must refresh the firewall configuration by reloading UFW:
sudo ufw reload

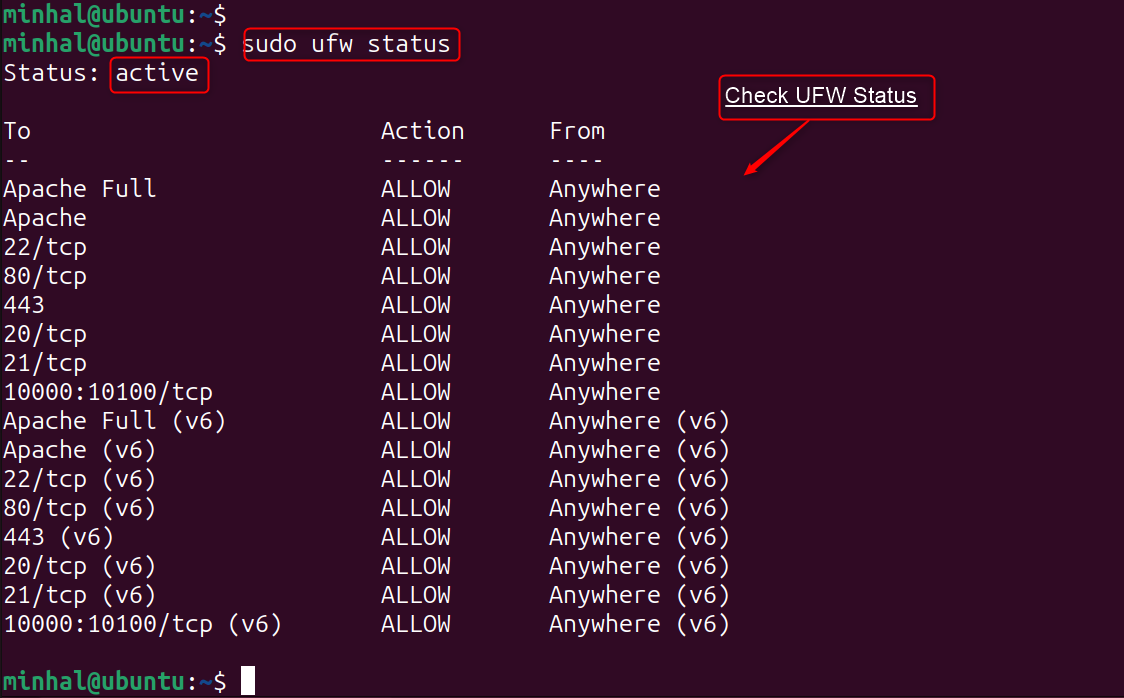
6. Check UFW Status
Confirm that the firewall rules have been successfully implemented by checking the UFW status:
sudo ufw status
7. Connect to the FTP Server (Verification)
To access the FTP server using VSFTPD on Ubuntu 24.04, input the server’s IP address or hostname as follows:
sudo ftp Server-IP-Address
sudo ftp username@Server’s-IP-Address
sudo ftp [system_name/hostname]

These steps successfully configure the Ubuntu server firewall for FTP access.
Step 2: Configuring VSFTPD
Next, configure VSFTPD to allow local and anonymous user access, file uploads, and restricted home directory access. Follow the steps below for Ubuntu 24.04:
1. Backup Configuration File
Begin by creating a backup of the original configuration file with a “.orig” extension using the “cp” command:
sudo cp /etc/vsftpd.conf /etc/vsftpd.conf.orig
2. Configure VSFTPD
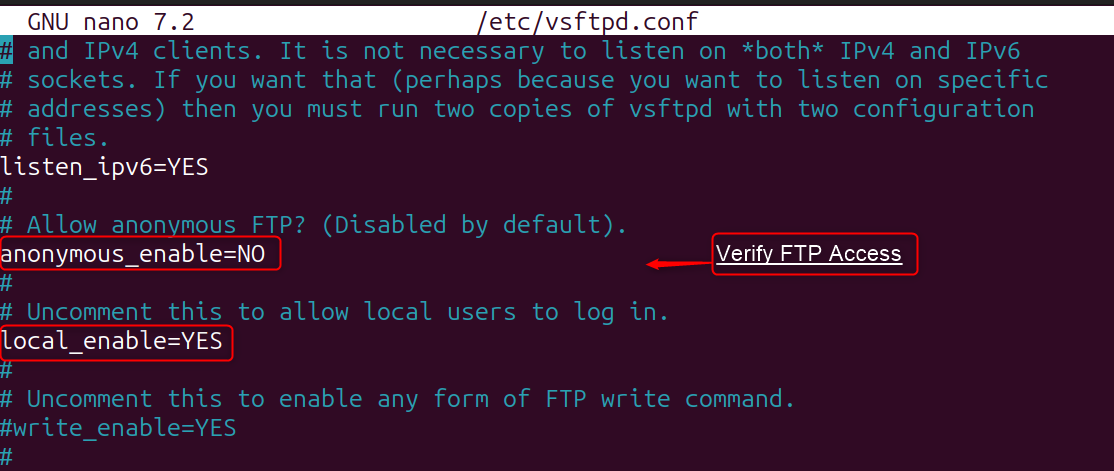
Access the configuration file for modification with the nano text editor:
sudo nano /etc/vsftpd.conf
Some common settings are given below:
3. FTP Access (By Default Settings)
To enable local user logins or configure local user access, follow below:
local_enable=YES
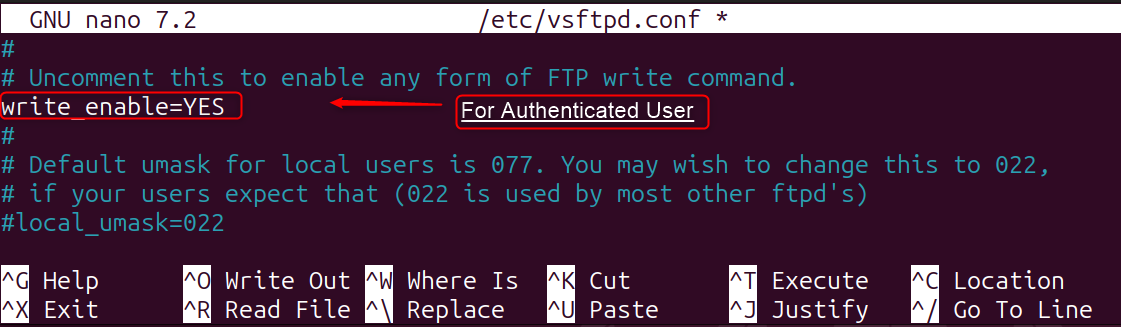
4. Enable Uploads
Uncomment this line to activate FTP write permissions for authenticated users, enabling file uploads:
write_enable=YES
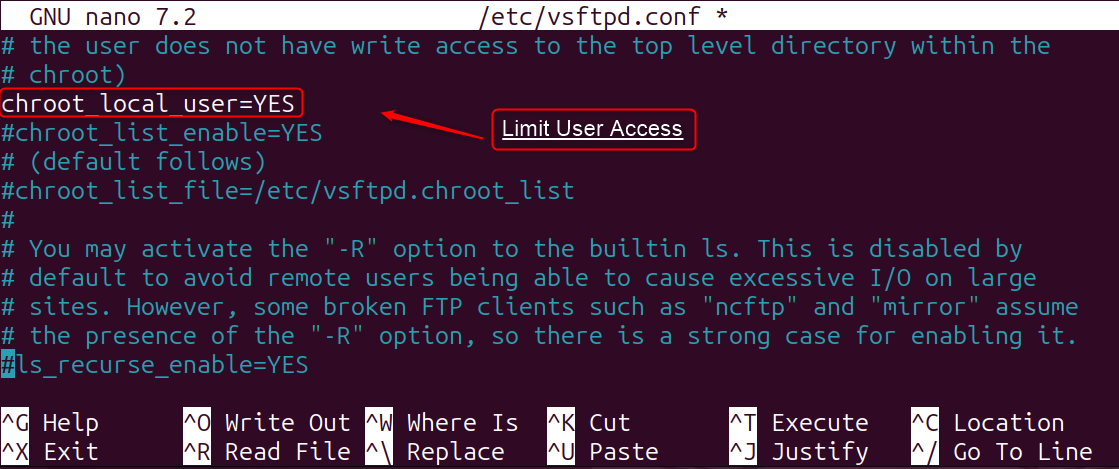
5. Chroot jail
For confining users to their home directories:
chroot_local_user=YES
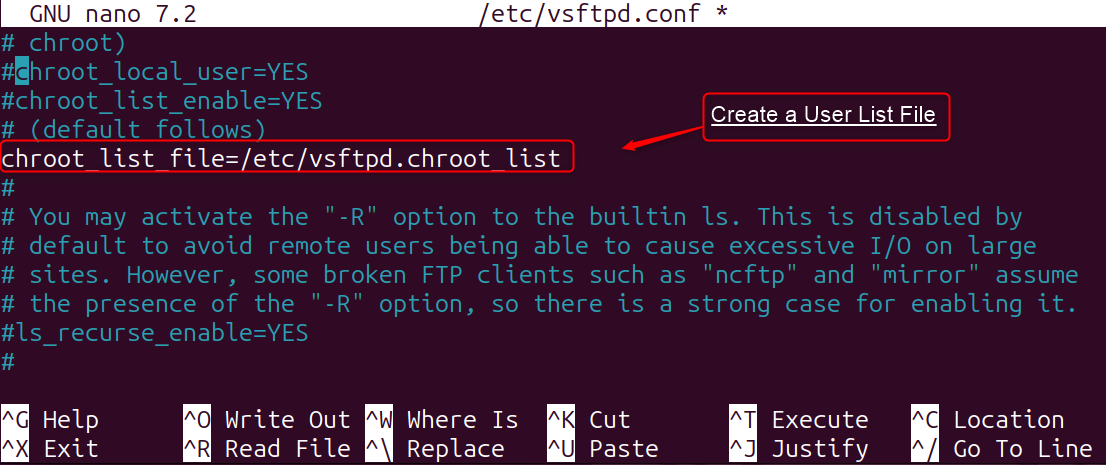
6. Create a User List File
Set the ‘/etc/vsftpd.chroot_list‘ path as the ‘chroot_list_file‘ value:
7. Restart VSFTPD
To activate the newly made changes, it’s necessary to restart the VSFTPD service:
sudo systemctl restart vsftpd

Step 3: Creating FTP Users
Enhancing FTP security by creating a restricted user account is essential. This user will lack sudo permissions and be confined to a specific folder for file transfers. We’ll illustrate this on Ubuntu 24.04:
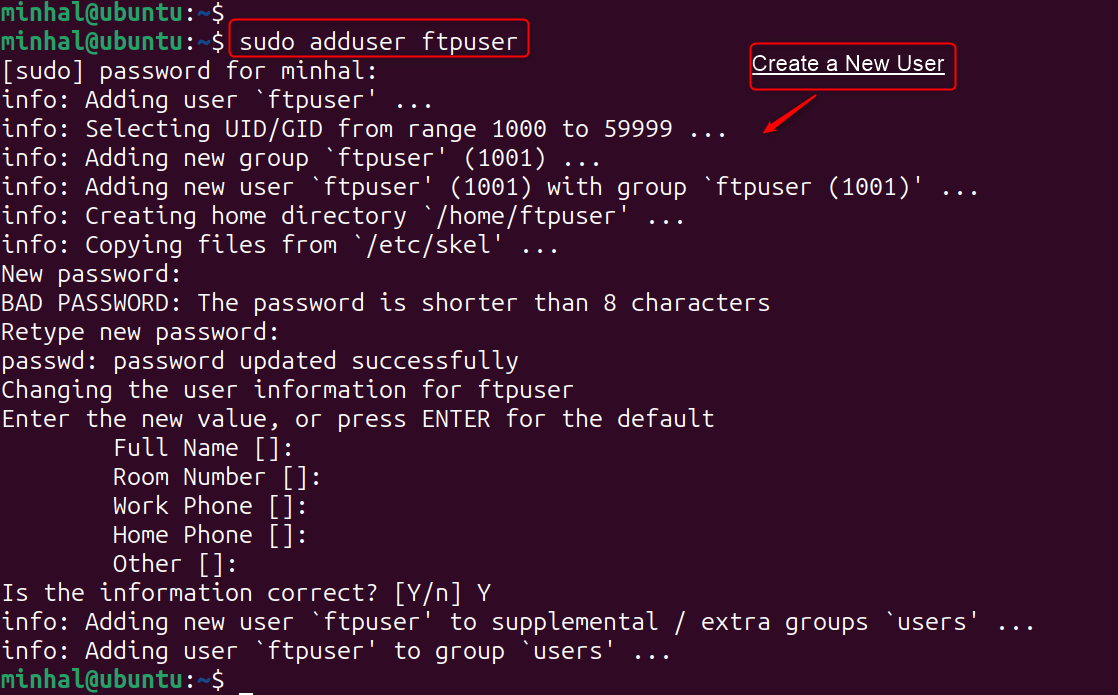
1. Create a New User
Use ‘sudo adduser ftpuser‘ to create the FTP user, then set a strong password:
sudo adduser ftpuser
2. Create the Directory Structure (Optional)
Now, users need to manage files as well as folders in a way that suits the workflow. You could create specific directories for uploads, downloads, and shared content:
sudo mkdir -p /home/ftpuser/uploads
sudo mkdir -p /home/ftpuser/downloads
sudo mkdir -p /home/ftpuser/shared
3. Set Ownership and Permissions
Assign ownership of the directories to the FTP user and group:
sudo chown -R ftpuser:ftpuser /home/ftpuser

4. Set Permissions to Each Directory (Optional)
Users can customize directory permissions. For example, the ‘uploads’ folder can be made writable, ‘downloads’ read-only, and ‘shared’ read-write:
sudo chmod 755 /home/ftpuser/downloadssudo chmod 755 /home/ftpuser/shared sudo chmod 777 /home/ftpuser/uploads
5. Configure the FTP Server
Next, configure the FTP server by editing its configuration file. Specify the user’s root directory and other settings as outlined in Step 2.
When using ‘chroot_local_user’, the user’s home directory should be read-only:
sudo chmod a-w /home/ftpuser
6. Restart the FTP Service
To complete the process, restart the FTP service:
sudo systemctl restart vsftpd

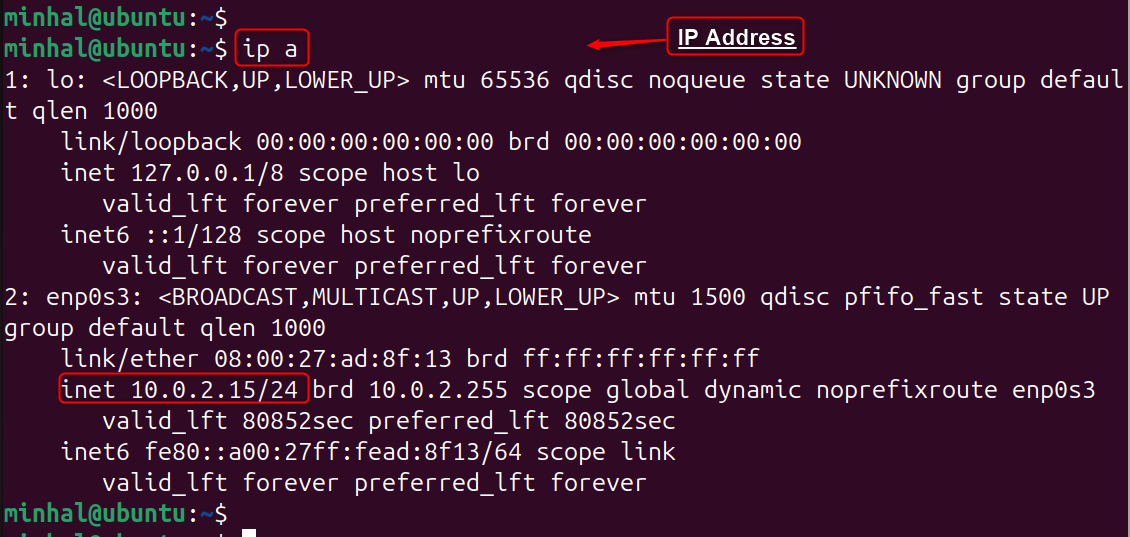
Determine the IP address with ‘ip a’ before FTP server testing:
ip a
Step 4: Testing the FTP Server
Verify the FTP server’s functionality by testing it with command-line tools or FileZilla:
1. Connect to FTP Server
Connect to the server via FTP using the new user’s credentials from a remote computer:

Users can also connect to the FTP server using VSFTPD on Ubuntu 24.04 by specifying the server’s IP address or hostname:
sudo ftp Server-IP-Address
sudo ftp username@Server’s-IP-Address
sudo ftp [system_name/hostname]

2. Uploading or Downloading a File
Users can also connect to the FTP server using VSFTPD on Ubuntu 24.04 by specifying the server’s IP address or hostname:
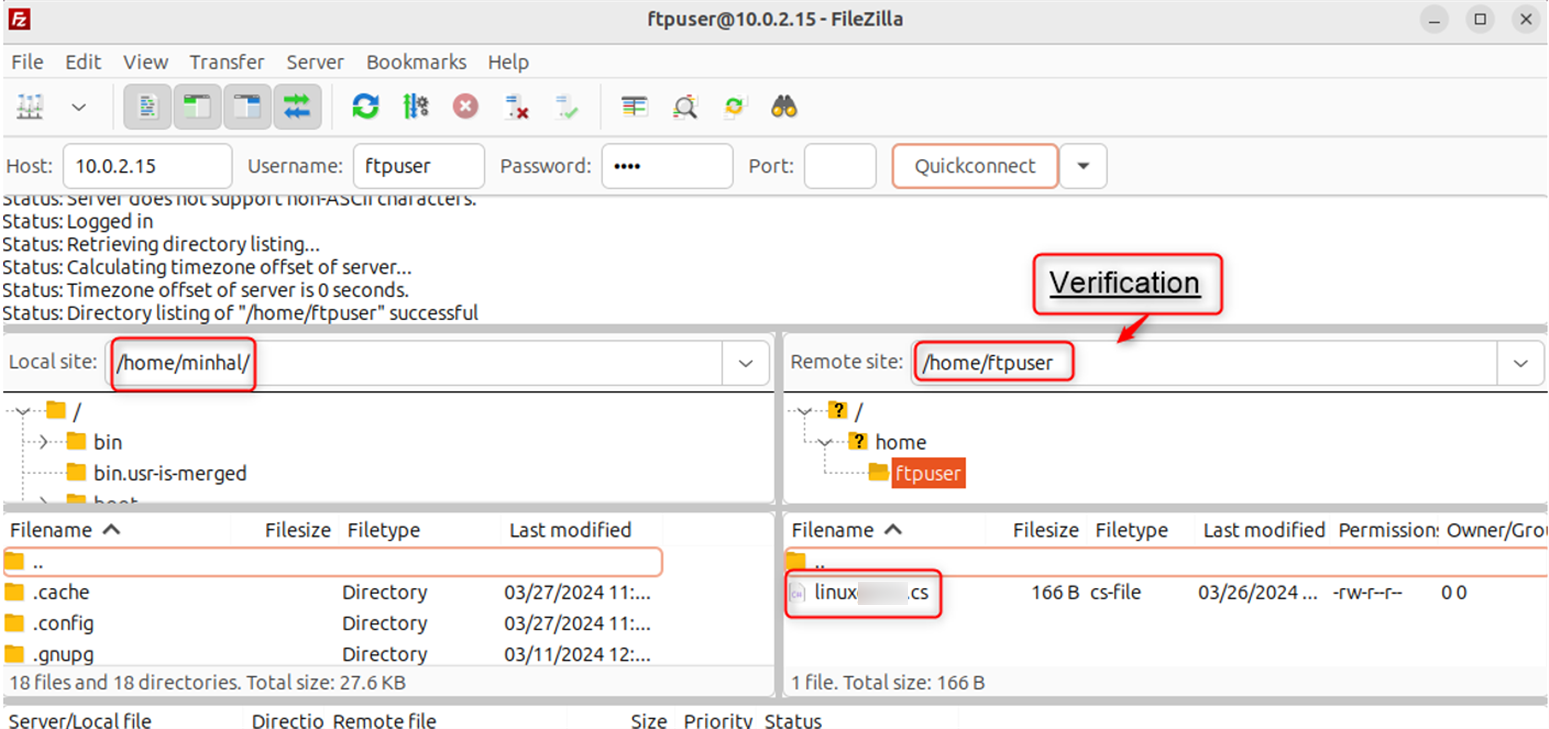
Using Terminal
Users can also manage files via the terminal. For example, to download ‘linux.cs‘ from the FTP server:
get linux.cs # Download a fileput linux.cs # Upload a file

This guide has outlined the basic steps for configuring an FTP server with VSFTPD on Ubuntu 24.04.
Conclusion
Setting up an FTP server on Ubuntu 24.04 is straightforward. Begin by refreshing your package lists and installing the VSFTPD package using the command sudo apt install vsftpd. The service will initiate automatically post-installation. To verify functionality, log in using the designated user credentials and perform standard FTP operations: uploading, downloading, and navigating shared files.
While FTP offers reliable file transfer capabilities, it’s crucial to prioritize security when handling sensitive data. Consider using SFTP, a more secure alternative, for enhanced protection.