IPv6 is the latest version of the Internet Protocol (IP). It offers an identification as well as location system for computers on networks and routes traffic across the Internet. However, there are scenarios where disabling IPv6 may be necessary, such as for troubleshooting, compatibility with certain applications, or network performance reasons. Additionally, some users might choose to disable IPv6 as a temporary security measure to reduce potential attack vectors, especially if they have concerns about IPv6-specific vulnerabilities.
In this guide, we will explore various methods to disable IPv6 on Ubuntu 24.04.
Table of Content
- How to Disable IPV6 on Ubuntu 24.04
- Method 1: Disabling IPv6 via sysctl Configuration
- Method 2: Disabling IPv6 via GRUB Boot Loader
- Method 3: Temporarily Disable IPv6
- Conclusion
How to Disable IPV6 on Ubuntu 24.04
Disabling IPv6 on Ubuntu 24.04 is typically done to address compatibility issues, security concerns, or network configuration complexities. While IPv6 offers advantages like increased address space and improved routing, it’s not universally adopted.
Let’s explore methods one by one:
Method 1: Disabling IPv6 via sysctl Configuration
On Linux, the sysctl utility is used to modify kernel parameters at runtime. The parameters available are those listed under /proc/sys/. Disabling IPv6 can be done by editing the sysctl configuration file.
Here’s a step-by-step guide to disabling IPv6 on Ubuntu 24.04 using sysctl configuration:
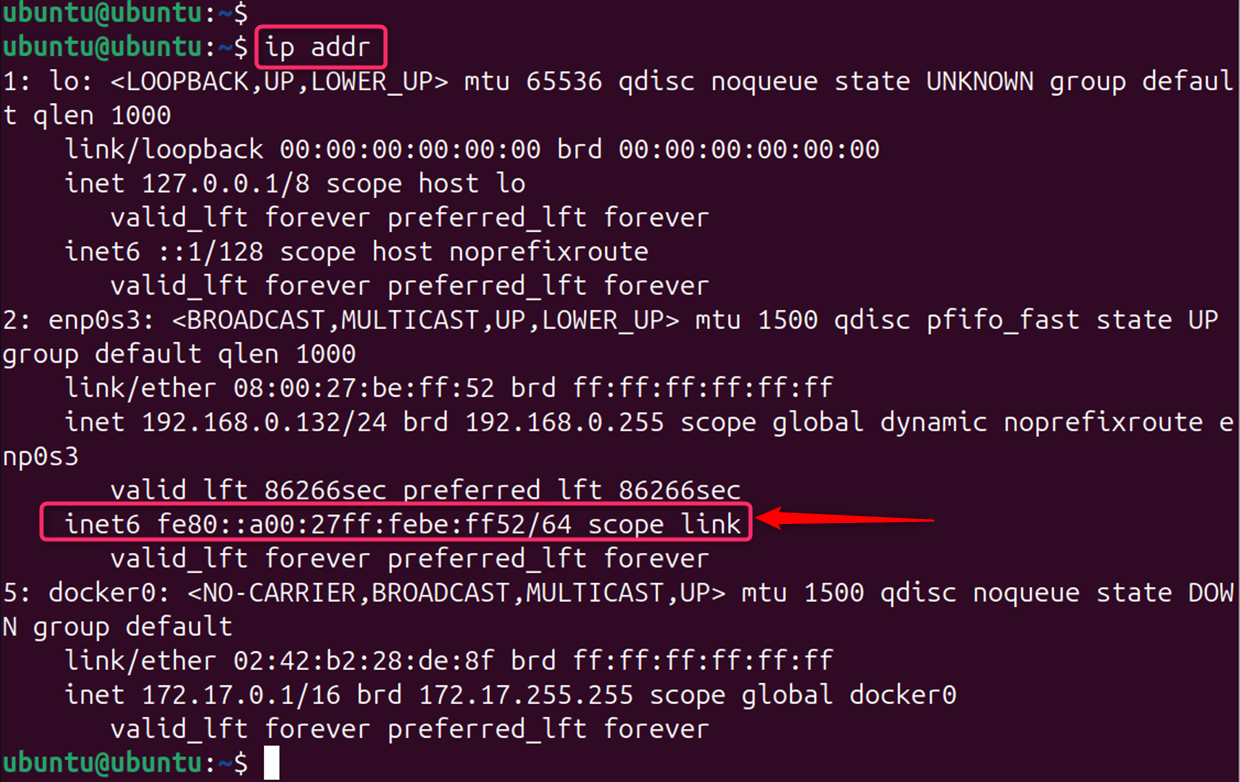
Step 1: Check if IPv6 is Enabled
Open the terminal and enter ip addr. If you see inet6 entries, IPv6 is enabled on your system:
ip addr
Step 2: Edit the Sysctl Configuration File
Use the command sudo nano /etc/sysctl.conf to open the sysctl configuration file in the nano text editor. Users can also replace Nano with their preferred text editor.
Let’s open the sysctl configuration file in the nano text editor:
sudo nano /etc/sysctl.conf
Step 3: Add IPv6 Disable Parameters
At the last of the sysctl configuration file, add the following lines:
net.ipv6.conf.all.disable_ipv6 = 1
net.ipv6.conf.default.disable_ipv6 = 1
net.ipv6.conf.lo.disable_ipv6 = 1
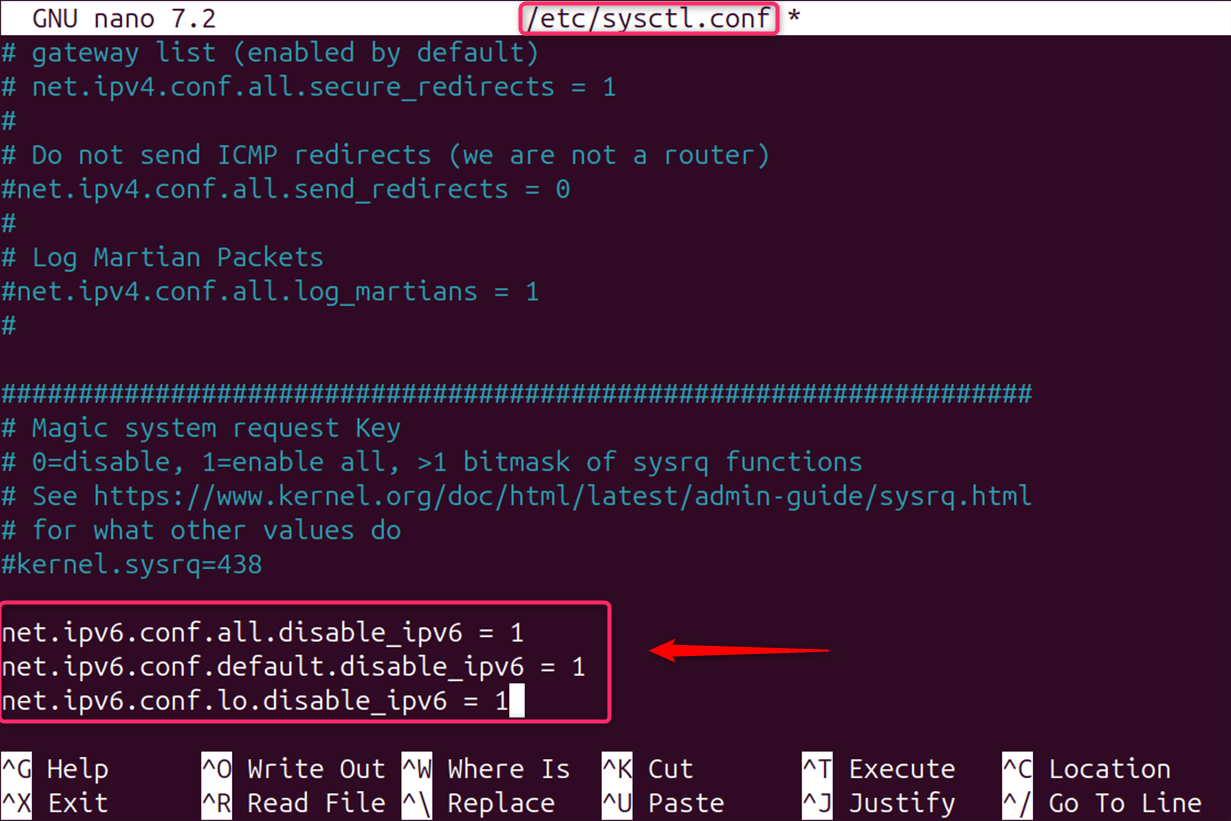
Save the file and exit the editor. They disable IPv6 on all interfaces, including the loopback interface.
Step 4: Apply the Configuration Changes
Save the file and exit the text editor. After that, implement the new settings by executing:
sudo sysctl -p

After these steps, IPv6 should be disabled on your system.
Step 5: Verify that IPv6 is Disabled
To confirm that IPv6 has been disabled, run the cat command with /proc/sys/net/ipv6/conf/all/disable_ipv6. If it returns 1, IPv6 is disabled on your system:
cat /proc/sys/net/ipv6/conf/all/disable_ipv6

Alternatively, users can utilize the ip -6 addr show command to check if IPv6 is disabled:
ip -6 addr show

Note: Remember, disabling IPv6 does not significantly affect the internet speed. However, as the world transitions more towards IPv6, it might lead to limitations in network functionality.
Method 2: Disabling IPv6 via GRUB Boot Loader
The GRUB boot loader can also be used to disable IPv6 by adding a kernel parameter.
Step 1: Open the GRUB Configuration File
First, edit the GRUB configuration file by running the below command:
sudo nano /etc/default/grub
Step 2: Edit the GRUB Configuration File
Find the line starting with GRUB_CMDLINE_LINUX and modify it to include ipv6.disable=1:
GRUB_CMDLINE_LINUX_DEFAULT="quiet splash ipv6.disable=1"
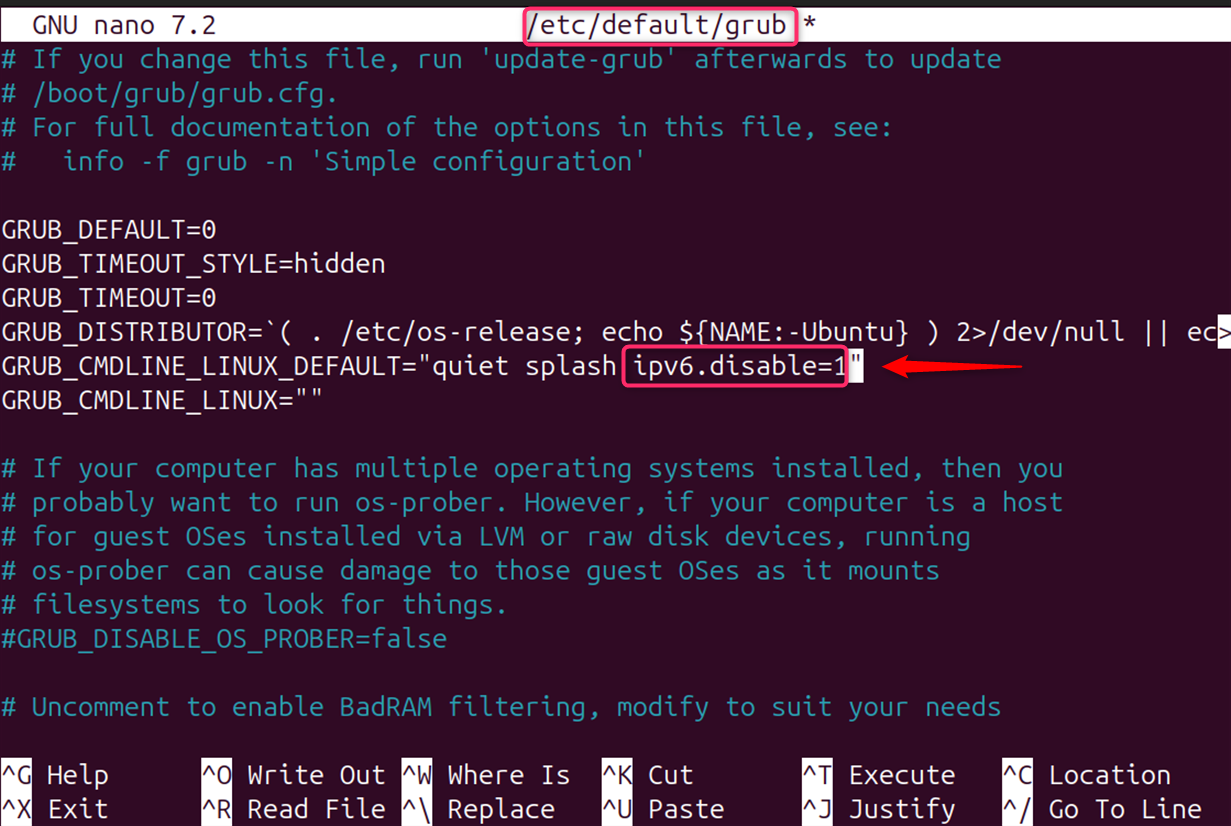
Save and close the file.
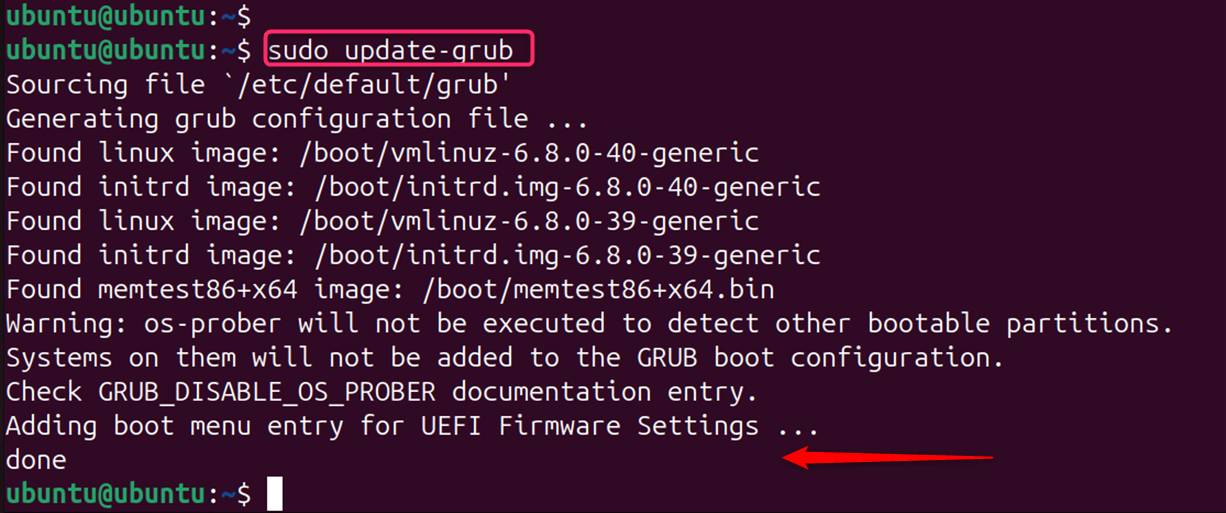
Step 3: Update the GRUB Configuration
Now, users need to update the GRUB configuration with the “update-grub” command:
sudo update-grub
Step 4: Reboot System
Restart your system so that the changes can take effect.
sudo reboot
This method disables IPv6 across all interfaces on your system.
Method 3: Temporarily Disable IPv6
To temporarily disable IPv6 on your Ubuntu system, you can use the sysctl command. This command allows you to modify kernel parameters at runtime. The parameters you will need to change are related to the disabling of IPv6 on all network interfaces.
Step 1: Disable IPv6 for All Interfaces
If you need to disable IPv6 temporarily, you can do so using the sysctl command. Here are the commands to disable IPv6 temporarily:
sudo sysctl -w net.ipv6.conf.all.disable_ipv6=1
sudo sysctl -w net.ipv6.conf.default.disable_ipv6=1
sudo sysctl -w net.ipv6.conf.lo.disable_ipv6=1
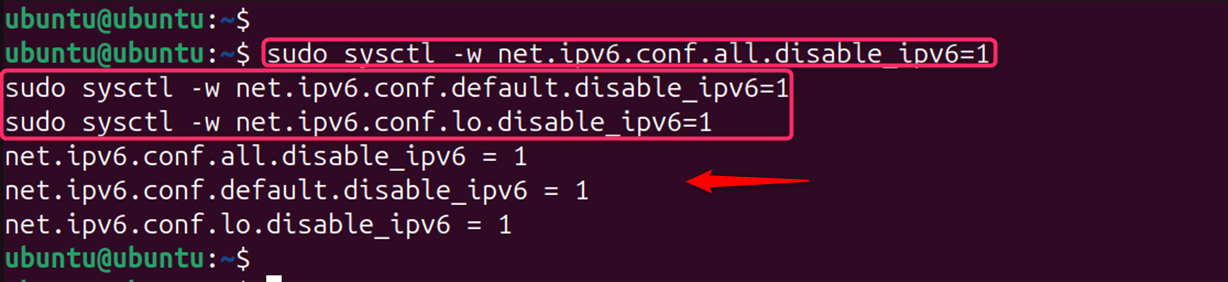
These commands disable IPv6 for all interfaces, the default interface, and the loopback interface respectively.
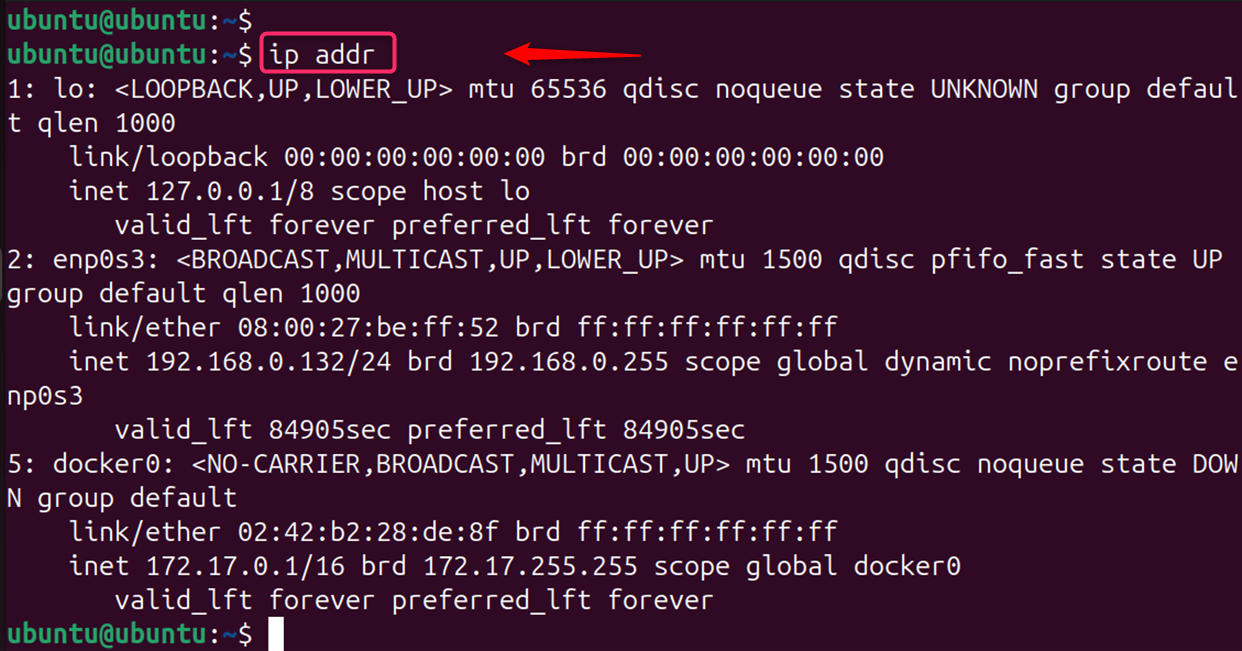
Step 2: Verify Disable IPv6
After running these commands, IPv6 will be disabled until the next reboot. To verify that IPv6 has been disabled, you can run the ip addr command and check that there is no inet6 address listed:
ip addr
To apply the changes, restart the network services.
This method disables IPv6 until the next reboot.
Important: Always make sure to back up the configuration files before making changes to avoid any unintended system behavior.
Conclusion
Disabling IPv6 on Ubuntu 24.04 can be done through various methods, each suitable for different needs. Whether you require a temporary solution or a permanent one, the steps provided above should assist you in achieving your goal. If you reboot your system, IPv6 will be enabled again. For a permanent solution, you would need to edit the /etc/sysctl.conf file and add the above parameters, then run sudo sysctl -p to apply the changes.
Remember to consider the implications of disabling IPv6, as it is the future of internet protocols and is increasingly important for modern internet communication. For more detailed instructions and additional methods, you can refer to comprehensive guides available online.